Translate

Friday, March 18

4 Darts Saree blouse - Perfect fitting - from Basic Bodice patterns

 Namaskar :)

Today we are going to make patterns for a saree blouse. If you are one of my Indian students, probably know already how to make a 4 darts blouse, but this time we are not going to make it with the traditional method. Instead, we are going to transform our basic bodice patterns into blouse patterns. Why? Because I have many requests and messages with doubts about the fitting of a blouse. As you probably know saree blouses almost always need adjustments, and often we have fitting problems when we make blouses. That is because in the traditional way, we use the darts with standard measurements, and standard measurements cant fit perfectly on different bodies.

Is because of that, that I thought to make blouses using the basic bodice patterns because these have custom darts. The width of the darts is obtained using our particular measurements, so the trick is to transfer those custom darts to wherever we need them for a blouse.

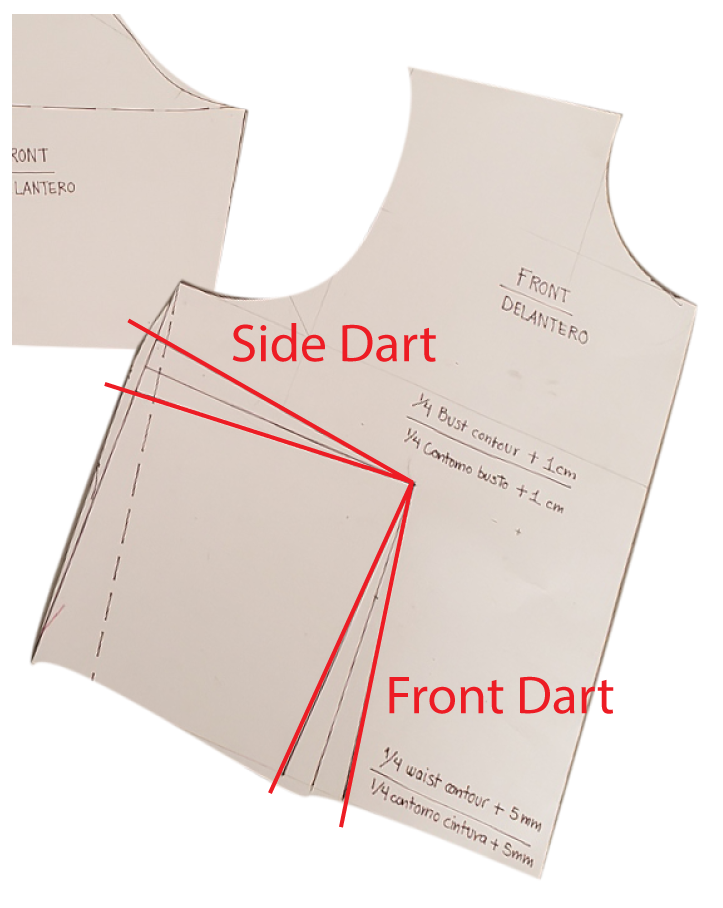
So these are the darts we have in the front pattern of the bodice block: 


The first is to make a copy of these patterns to make the transformation. Then mark the length you want for your saree blouse and trace the base line. Check the widths of these 2 darts 👆 and add them together. The result is the darts' total width, and is this width what we have to distribute in the 4 darts we want for our blouse.
Look at the next pictures to know how to distribute the darts:


Then just draw the neckline shape you want, and transfer the same length and shoulder to the back pattern and your patterns for 4 darts blouse are ready:)

We don't need to make any transformation to the basic sleeve unless you want to use a special design.


Here you have the video class to see every detail of the process 💕


Wednesday, March 9

Blusas para Saree.

Hola !

Hace un tiempo les subí un par de clases a mi canal de youtube acerca de sarees, en donde explicaba, qué es un saree, como se viste y cómo hacer uno.
En caso de que no hayas visto esas clases, aquilas tienes:


Después de esos videos, muchas de ustedes me preguntaron acerca de las blusas que se vistencon los sarees, y por fin aqui les traigo la información. Espero que les sea de utilidad y que les guste :)


TIPOS DE BLUSAS SAREE (TRADICIONALES)


Aunque actualmente existen una inmensidad de diseños de blusas para saree, la mayoría son una variación de alguno de los diseños tradicionales, que se han vestido desde siempre en el sur de la India.
Las blusas tradicionales pueden identificarse de la siguiente manera:


BLUSA DE 4 PINZAS

Es una blusa muy sencilla que como su nombre lo indica tiene 4 pinzas en la parte delantera. Es ideal para mujeres con poco busto, quienes pueden vestirla a diario ya que al no tener un busto grande no hay el riesgo de que la blusa se levante al levantar los brazos. Sin embargo con un buen manejo y ajuste de pinzas a la hora de trazar y confeccionar puede adaptarse a cualquier tipo de cuerpo si se quiere vestir para ocaciones donde no  se vaya a realizar mucho movimiento de brazos o actividades diarias.


BLUSA CORTE PRINCESA

Es una blusa que se adapta mejor a todo tipo de cuerpo y tamaño de busto, tiene el clasico corte princesa que todas conocemos y es una de las mas populares.
Tiene dos variantes, corte princesa normal y corte princesa con faja (no se si esta sea la palabra correcta para referirme a la parte baja de esta blusa, pero entenderán mejor viendo la foto, es una especie de tira que ajusta a la altura de las costillas y ayuda al soporte de bustos grandes)


BLUSAS KATORI

Este tipo de blusas han pasado de moda entre las nuevas generaciones de mujeres en India, quienes prefieren modelos mas sofisticados. A pesar de su compleja elaboración, son blusas que generalmente se fabrican en telas de colores planos, para vestirse a diario. Gracias al soporte que aportan al busto pueden vestirse sin bra y debido a esto fueron el diseño tradicional por excelencia de las mujeres de pueblos rurales en India, quienes debido a todas las actividades que tenían que realizar necesitaban blusas comodas y que no presentaran inconvenientes ante ningun tipo de actividad fisica.
Tienen dos variantes:
Katori: con la pieza de la copa que se cose por separado.
Doble katori: con la pieza de la copa que a su vez se compone de 3 piezas.


Actualmente los diseños de blusa para saree son tan variados que es imposible calsificarlas todas, pero los que hemos visto aqui son los diseños clasicos/tradicionales y constituyen la base de todos los diseños modernos que son variantes mas elaboradas o adornadas de los mismos.

Otro punto importantísimo de las blusas saree es el diseño de la espalda, ya que como pudiste ver en el video donde esplico qué es un saree y como se viste, la parte de la espalda queda al descubierto, lo que hace ideal el poder lucir un diseño bonito de nuestra blusa en la espalda, muchas de ellas se atan en la espalda por la parte de los hombros con colgantes hermosos llamados Tassels para asegurar que la blusa no se baje de los hombros si el escote enla espalda es demasiado abierto, lo que es comun en las blusas para saree.


Imagen propiedad de southindianfashion.


Proximantente: Video Cómo hacer la transformacion de patrones básicos para blusas de saree.

Si tienes alguna duda, no dudes en dejarme un comentario.

Sandy.


Monday, March 29

Digital Pattern Making Course

Dop you like pattern making and you wish it was a way to make the process faster, easier, and more professional?
This course is for you.
You will learn how to create digital patterns, transform them and grade them to different sizes.
The classes are suitable for beginners who want to learn the digital method from start, but also for intermediate and advanced pattern makers who want to upgrade their knowledge and be competitive in the digital world.

No previous advanced knowledge needed to take this course. You need to know the basics about pattern making, and if you dont, i have free tutorials for you.


 Advantages of digital pattern making:

Trace your patterns once, and print them as many times as you want.
Trace one size and easily grade to more sizes.
Save space, store all your pattern library in your computer instead of a shelf.
keep your patterns safe from weather, pets, etc, print them just when you need them.
Dont waste paper and other materials, you dont have to remake all the pattern to correct mistakes.


Materials and tools requiered for the course:

* Adobe illustrator CC and computer that supports it.
* Pattern making books (will be provided by the instructor)
* Facebook account. The classes will be given in a private facebook group.

No specific schedulle, you can take the classes either live, or watch them later when you have time.
I will be available always to clear your doubts and guide you.

Permanent support in your projects.

Fees

39 US Dollars

How to enroll in the course:

Click on the pay button below.

Send me a screenshot of your payment by WhatsApp to this number: +5215613202849


↓↓↓↓PAY YOUR COURSE HERE↓↓↓


IF THE PAY BUTTON DOESNT WORK OR DONT PROCESS YOUR PAYMENT, SEND IT DIRECTLY FROM YOUR PAYPAL ACCOUNT TO MINE USING MY EMAIL: cloud_factory@ymail.com


Enroll now and upgrade your knowledge, start making digital patterns and get into a new competitive world of fashion business! :)

 If you want to see my work in fashion design and patternmaking check my youtube channel:

Sunday, December 6

Patrones básicos de pantalón

 Hola

Hoy, para completar nuestro set de patrones básicos tenemos la clase para hacer pantalones básicos de pantalón. Si quieres ver las clases anteriores de esta serie, aqui tienes los links:

Patrones básicos de tops y blusa

Patrones básicos de manga

Patrones básicos de falda

Ahora, cómo hacemos nuestros patrones de pantalón?

Vas a necesitar las siguientes medidas:

💛Contorno cintura

💛Contorno cadera

💛Largo pantalon (de la cintura al tobillo)

💛Contorno tobillo

💛Largo tiro

Si necesitas ayuda para tomar las medidas, checa este post👉 click aqui

Acerca del largo tiro: es una medida con la cual suele haber muchas dudas, y es muy importante tomarla bien para que los patrones no tengan ningun problema. Aqui te muestro 2 maneras de tomarla:

1: Sientate en una superficie plana. Ata un cordón a tu cintura y mide desde el cordón hasta la base donde estas sentada, toma esta medida con una regla rígida.

2: Toma la medida del interior de la pierna y el largo pantalon por el costado de tu pierna, resta el largo interior del largo exterior y el resultado es el largo tiro. Ve la figura a continuación.

Para más detalles y tips para una medida de tiro perfecta vé la video clase que aparece al final de este post.


Ahora, si, aqui tienes un diagrama con las instrucciones para trazar tus patrones de pantalon, complementa la información con la video clase para que tus patrones te queden perfectos, en el video tambien tienes la explicación de los ajustes que hay que hacer a los patrones para que ajusten bien a cualquier tipo de cuerpo y para corregir algunos defectos que suelen aparecer a la hora de coser nuestra prenda.


Si tienes alguna duda, déjame un comentario y no te olvides de checar la descripción del video en youtube para cualquier actualización o informacion extra acerca de la clase.

Felices trazos

Sandy
💙


Basic Pants Patterns / Pants block

 Hello Clouds

Today, to complete our set of basic patterns or basic bodice patterns, I bring you the class to make pants patterns. if you want to see the past classes on this topic here you have the links:

Basic Top patterns

Basic Sleeve

Basic Skirt

Now, how to make your pants patterns?

You are going to need the following measurements:

💛Waist contour

💛Hips contour

💛Pant length (from waist to ankle)

💛Ankle contour

💛Crotch length

If you need help on how to take the measurements, check this post 👉 click here

About the crotch length: this is a very tricky measurement, and it's vital to get it accurate for a good result in our patterns. You can get it in 2 ways as shown in this image, 

1: sit on a flat surface and measure from your waist to the surface

2: outside leg - inside leg = crotch length

For more explanations and more tips on how to get the perfect crotch measurement see the video class at the bottom of this post.


Note: This method is to trace customized patterns, so we are not using any chart of standard measurements. Customized patterns are made specially to fit the body type and real measurements, so for that, we use formulas you see in the diagram below, for example, when we divide our hips contour by 32 to get the crotch curve.

These formulas are based on the proportions in our bodies. Whatever is our body type, it is always proportioned so these formulas will work and we will get more accurate patterns than if we use a measurements chart. In this way for example, our armhole length is equal to one-sixth part of our bust contour, our front crotch extension is equal to divide our hips round by 16, etc.


For more details about the formulas, measurements to mark, and the modifications you need to make for different types of bodies, see the video class below, if you have any doubt, leave me a comment and I will be happy to help you.


Happy stitches

Sandy
💙


Tuesday, May 5

Semi tulip salwar

This is a variation of the popular tulip salwar in which the leg pieces are not overlapped but stitch it at the front.
Is made as i show in the diagram
My recommendation here is to make it a little bit longer and adjust later if needed. These types of salwar where the leg pieces are semicircular always get shorter than we planned while making them.


Wednesday, April 29

off shoulders blouse with lapel

Another design of blouse, similar to the last one.
I really dont know the style name, if you know it, leave a comment in this post :)
this one is princess cut, so the neckline has to be transformed first, then apply the princess cut method. And of course you are going to need the basic patterns. if you dont have them you can see how to make them here: BASIC PATTERNS TUTORIAL


Tuesday, April 28

Boat neckline with collar /lapel (?)

i dont know how to call this style, i say is a boat neckline.. with a lapel ?? or collar?
whatever it is, is a cute style.
This draft was requested by Sunita, a member of our Whatsapp group,.
I wish io could make these drafts often, i really enjoy making them.
You are going to need basic bodice patterns and then transform them as i explain in the draft.
Anyway.. here you have it, i hope you like it.


Thursday, April 16

Cowl dress

#Cowl #dress. For this technique you need a fabric which is at least 1.50 mts wide, if your fabric is less than that cut the top apart and stitch by the waist.

Vestido drapeado

Como hacer un #vestido #drapeado. Para éste necesitan que la tela sea al menos 1.50 mts de ancho, si no, pueden hacerla aparte de la blusa aparte y coserla a la parte de la falda por la línea de cintura.